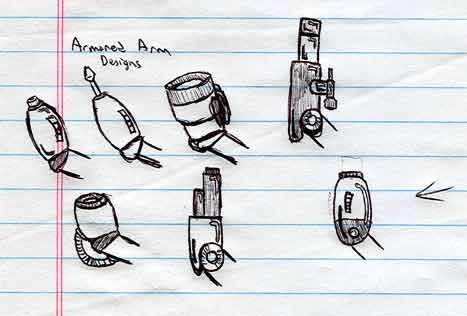
Decisions, decisions... Which arm cannon should I choose? If I hadn't sketched multiple possibilities, I'd have gone with the first one that popped out. It would've sucked.
|
Decisions, decisions... Which arm cannon should I choose? If I hadn't sketched multiple possibilities, I'd have gone with the first one that popped out. It would've sucked. |
Sketching can help you select the best of multiple ways you can do a strip. Or, if you only have one idea, you can refine it until it "looks right."
THE IDEA BATTERY.
Second, if you have a great idea for a future strip, but have no time to flesh it out yet or are not in a point in a story arc where you can introduce it yet, then it helps to commit it to paper in sketch form. The reason? If you wait, you'll forget it.
In addition to saving an idea for later, it also helps to have an idea backup. Anyone who's had a case of cartoonist's block can tell you that it's not always easy to sit down, plan a strip from scratch, and do it up real nice in one sitting. The question of what to do this week/day/time/whatever is not an easy one to tackle sometimes. If you can go to a shoebox or folder full of stored-up ideas from the past, you can just say, "I'll do that one!"
The beauty part is that, if the shoebox is big enough, you can keep drawing ideas from it until your cartoonist's block is cleared.
THE GAG STRIP
Whether your layout is a three- or four-panel strip or a full-page comic, the same principle applies if you are using your comic to tell a joke. Timing is everything. Make sure that the pacing is befitting the type of joke you want to tell.
Gary Larson's "The Far Side" comics told jokes mostly with ironic situations and strange juxtupositions that lent themselved to single panels. Stephen Pastis and his "Pearls Before Swine" jokes have long setups that usually require 3-4 panels. See the figure below:
This is a nice basic layout that lends itself to all three major parts of a joke:
HIGH DRAMA, ACTION, OR SUSPENSE
If you're in the business of doing comics that tell stories, the question you have to ask yourself is, what do I want to convey in this particular strip? Is it going to be exposition, giving some backstory on your antagonist? Will it reveal something surprising? Will it be a boatload of action?
Set up the panels accordingly. Important actions or images usually go into bigger panels. It doesn't always have to be that way if the dialogue is what's important. See some of the examples here:
| IMPORTANT EXPOSITION | REACTIONS TO A BIG EVENT | BUILDING UP TO A SURPRISE |
 |
 |
 |
Pay careful atention to:
|
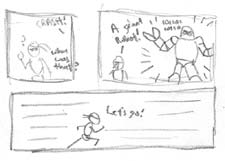
Incidentally, here is a preliminary sketch of the scene I'll be using for the remainder of the tutorial. It's a very simple concept. A robot crashes through a wall and CyberJoe springs into action. We'll take this from sketch to fully-realized comic over the next few tutorials.
Please note that the way I do things is not neccessarily the best way for all comics, and maybe not for your comic, but it has served me well and could serve you just as well. |
 |
Continue on to Pencils and Inks! |
|
"Active Stupor Heroes" is hosted by
Comic Genesis, a free webhosting and automation service for webcomics.
All material on this site is copyright 2002-2006 by me: Jason Tucker.
|
|


